Friday, November 2, 2012

I know caught up in the middle, I cry just a little-Flo Rida

Hey all... while Shane's at work I figured I'd use this time to brag on his excellent craftsmanship skills in the table-making-arena.

But first...a story:
I think we all have moments or periods in our life when its easy to forget the goodness of the Lord. And I'm talking generally. We get caught up in the middle of life and forget to stop and listen and see God in the small, so eventually we lose Him in the big. I heard this sermon by Bill Johnson (I can't remember the name) and he was talking about when we can't seeing God. He said that when we can't see God, we need to listen for Him...and if we can't hear him or see him, we need to remember Him. This is so GOOD. so good. Think about it: remembering the things and places the Lord has brought you out of, remembering the specific times where he was evident in your life...that leads us to hear him...and once we hear him again, we'll begin to see him again. So this is is a story to remember him.
All week Shane has been studying his rear off for this test he had today. And while he's studying really hard and stuff I'm like drawing or something really fun. Anyway, last night he was hittin it hard because the test was first thing this morning. I thought I would be a thoughtful wife and ask how the studying was coming along. He said he hoped he was studying the right material because he wasn't a very good test-taker. I just said something like "you can do it babe"...really motivating like. He finished up around midnight with his studies and we go to sleep.
This morning I woke up when Shane did because my neck was hurting, so I heated up my rice bag and went back to bed. Before I fell asleep I remembered that I should pray for him because his test was in a little bit. I don't remember everything I prayed but I do remember praying:
Jesus give Shane favor upon favor on his test today. We place the cross in between the repercussions of Shane speaking "I'm not a very good test-taker" and Shane. By the blood of Jesus we declare today that he is a good test-taker and we thank you for the good gifts you want to give us and ask that it would be a 100. That you would bless us with the gift of a 100! ...Then I fell back asleep and started drooling.
When I woke up Shane said he was coming home for his lunch break or whatever and I asked him "So how'd it go?"
"I got a 100..." 
Comeon! Remember. 

Okay now time to brag on Shane's $killz:
Well per usual I forgot to take pictures of every step...like I think I only have one or two pictures of the whole project, so it might make it look like it was easy, but for the layman, it was no easy task. But for my husband, piece uh' cake (in a mobster/italian pizzeria man voice).
We needed a dining room table because the table my sister Amber and her husband gave us did not make it through the move. We shopped for a while online and around here and all the tables we liked were like 5hundie and above. Uhm, no. So we decided to build one. Here's how it went:
Lots of time at Lowe's (like 4 hours...planning).
Buying the wood and transporting it home in my civic...from a local lumberyard. Good thing we didn't have far to travel.
Shane measuring, cutting, assembling, staining, and painting.
Me, painting and sitting or cooking.

We originally looked at this blog for the plan, which I love because she tells you exactly what you need etc., but we ended up going out on our own and starting from scratch.

Here's what I got:

As you can see Shane had already done a significant amount of work....

The bottom of it. TBA (to be attached).

               
the legs. Yepp they are for deck posts outside.

Finished building and sanding...now on to staining, sealing and painting...

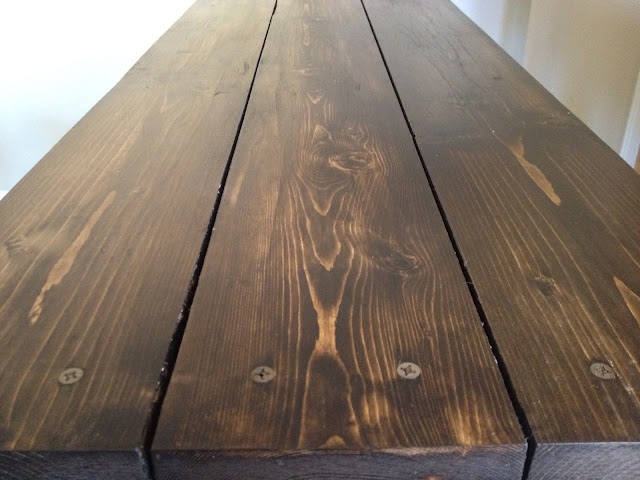
After the stain and seal. He used wood filler in between the cracks so its a nice level surface. The top is distressed a little. We took chains and beat it up and made the edges a little rough.

I picked two colors because I wanted to distress it. So I painted yellow on the wood first. Let that dry then covered the yellow with green. 

Here's the table finished with paint. Now al that's left is distressing. I didn't get any pictures of that for some reason. So skip to the finished product:

You can only see the distressing a little because of the shadow. And let's be honest I'm too lazy to take another one in better lighting and upload it instead. 

The top all smooth and stuff.


It is finished. Now all we have to do is save up to get some pretty chairs to go with it.  

Friday, October 26, 2012

Reupholstering a chair is reupulsively time consuming

First- let me say, I'm reading this and its a good awakening book. I think its the staple to my half-mid-life crisis. So if you want to have a life crisis of your own (more like a life-blessing) read the book!

Okay, the chair. I'm going to try to be step-by-step about this just so you learn from my mistakes, but I forgot to take pictures of some of the steps.
We found this when we were back in Texas eating at Sushi Cafe in Denton. Where you ask? That's right, a dumpster. This and that. Fo FREE! So of course we took them.
When we got back to Del Rio with our sweet A finds, I started shopping for fabric immediately. I looked online a little, but really had my sights set on a store in Abilene called Relics. They have the coolest furniture and TONS of fabric swatches so I decided to order from them. One regret I do have about the whole thing is not researching on the internet more before I bought fabric in-store. It gets really expensive really quick. So I bought fabric from the store, and when it came in, I just wasn't inspired by it for this chair. WASTE. So I looked on JoAnns fabric, and found a gem. Its been used before, but I loved it so I ordered it too.
Okay here we go.

Supplies:

Sewing Machine
Brains
Heavy-duty staple gun. (I didn't have a air-pressure shooter gun, so I had to use a manual staple gun. May the force be with you because I had blisters galore when I was finished stapling).
Pencil to outline the pattern with.
Sewing pins (I'm not sure of the technical name. Those needles with the balls on the end.)

Here's the chair starting off...and here's me being too serious in the background...creeper.
Basically I just started ripping everything off. There were a MILLION staples that had to come out. Take all of them out. Take all of the stuffing (batting) off and out. Basically you'll have a chair with just the bones. This was the most time consuming part of it all in my opinion. Next I had read on numerous internet sites that you're supposed to start backwards. So whatever you ripped off LAST is FIRST. And so I started with underneath the seat cushion. (Its a good place to start for those of us who have never done this before). 


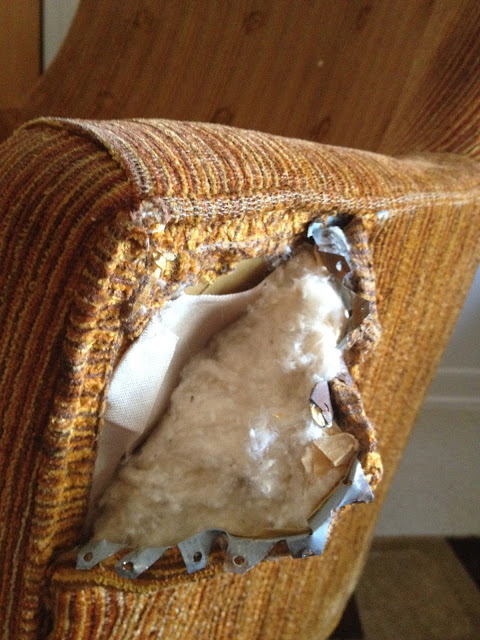
I don't know if you can see all the metal things. I don't know what the technical name for those are other than a pain in the ass to get out. Once you take off the old fabric, SAVE IT FOR THE PATTERN. Take out all the stitching. So pieces that were sewn together (the front and the back) take apart. So instead of one piece of fabric for the entire front, its broken up into three: left side, center, and right side. Trace all the patterns! Leave an inch or so on the outer edges, but on the sides that will be sewn, trace very close to the original, that way your new pattern is more accurate. What I did was pencil in the EXACT edge and leave an inch after that before I cut it. That way you know exactly where you should be sewing. On the inside of the chair (backrest and arms) I would leave a few extra inches around the outside edges, that way you have PLENTY of leeway to add more stuffing and do your tufting; still having enough fabric left to staple at the end.
This is before I took the canvas backing off and found a lot of old stuffing and moldy candy. 


The orange is old batting. It literally fell apart in my hands when I touched it. So none of the stuffing was really salvageable (mo' money, mo' problems, you know what I'm sayin)? Above also I started taking off the canvas. I found all this random skinny rope and was like "ew what's this?" and the chair eventually revealed it was the string holding the tufted buttons. 

This is after I ripped off the bottom part, the part under the cushion. You can kind of see the gross batting on the seat. Pull all of that off. Don't be scared like I was. 

At last! after the chair was started. So I found an old sheet and decided that would be good for the "under-the-cushion" part. You apparently have to sew that and the fabric for the lower section of the chair together. That was a thorn in my side, let me tell you. I don't have pictures because honestly I was so frustrated that was the LAST thing I wanted to be doing. I also thought at this point "what have I gotten myself into"? ...It's completely normal. Soldier on! All I remember is having to make cuts at the corners and sew. It wasn't pretty. But I did it somehow. Sorry no step-by-step for that. As for tucking the sheet material and securing it, TUCK AND PULL AND PULL AND PULL and staple. Leave PLENTY of extra fabric for that area. You'll probably need it. And you can just cut it off once you secure it with staples.

Okay I finally attached the bottom part. It took me like a day. Okay just kidding...but it took like 6 hours because I wasn't sure what I was doing. And mistake numero uno: I didn't leave enough sheet to tuck and pull in the back! So I had to stick my stapler up the most random parts to secure it. Next:


Continuing with the moving backwards theory, I started with the arms. All I really did was staple the fabric on the outside of the chair. It doesn't have to be pretty because it'll be covered up. Once I stapled just a line, I stuffed batting under the fabric and moved it around til it looked profesh. Then I TUCKED AND PULLED AND STAPLED under and through the cushion-seat part. My chair has kind of a weird curve I didn't really plan for with the arms so I just kinda went with it. Made folds and tried to make it look like it was purposeful. Okay the piping was an annoyance because it took time. Here's what I did:
I reused the old piping. Its really just rope but I felt like I had already dropped a milli on this chair so I wanted to conserve what I had. So I just cut the stitching and started pulling the fabric apart so I could just pull the rope out.
Like so. I Just pulled and kept pulling until it came out. And yes I'm still in my pajamas. It was probably 4 o'clock or something. Who cares. So once I got the rope out, I just laid it on the fabric, cut a strip about 1/2 inch longer on each side. Then I folded the fabric and pinned it. Then finally I sewed it...viola! The piping finished. 

                         
Next I just stapled the piping along the outer edges of the chair. Starting at the bottom and going all the way around
.      
Okay so after the arm, I had some trouble. It was really difficult for me to match the old pattern of the front precisely (aka I left an inch extra on EVERY side, instead of just the outer edges, so my 3 pieces were off center and it was annoying). So I had to kind of just guess and check. BLAH! Just continue to do what you did on the arm once you line everything up. just staple along the back, then stuff the batting under the fabric to your satisfaction....then before you tuck and pull and staple, let's secure the buttons:

If you have tufting to do, DO THAT BEFORE YOU TUCK AND STAPLE THE FRONT AND SIDES PATTERNS. This is the ONE thing I wish I would've done differently. It would make such a difference. I actually contemplate redoing the entire chair just for the tufting. 
SO to tuft:
I bought these buttons at Wal-Mart for like 2 bones each. They have the "maker" in it too. Basically you just push the fabric in and fasten the back to it. Here's where I would recommend some super glue to secure the backing on. (I didn't and like all of them popped off when I was securing them. Annoying). 
After you've made the buttons, get some rope or something to fasten the buttons through the front of the chair to the back and staple them tight. I ended up using a needle to poke through the front and pull to the back. Then once I pulled to my satisfaction, I stapled the rope to the bones of the chair. Since you haven't pulled and stapled the front or sides yet it should look real nice and fluffy as you tighten and pull and staple the button. (Mine looks a little stiff). I don't have a picture of this! Sorry. 
But this is kinda what it looked like from the back at this point. You can see the extra fabric, batting and also the piping!

Okay here's another difficult part: The backside. Like I said before, you should have each pattern of the original fabric to be your guide, so leave an inch or so extra along the OUTER EDGES, and next to none on the edges that will be sewn. Once you've sewn the pieces together to make the back of the chair, we start the difficult part. I used cardboard because it was free and flexible enough. The cardboard is the guide to your straight edge along the backside (as you can see below). So just staple and staple. I personally didn't see the point of putting batting on the backside, so I didn't. 


The tough part for me was stopping every once in a while to make sure your pattern aligned nicely with the chair. Keep tucking the fabric over the cardboard and stapling. It's going to get more difficult to staple as you go...and I wish I had a solution for it, but I don't..and I couldn't find one on any of the tutorials I used. I would staple the entire top along the chair before I started stapling the bottom. Hopefully that will make it easier for you. (I stapled top and bottom evenly as I went). 


Here's the chair with all the fabric tucked and stapled. I hadn't stapled the back at this point because there are no buttons. So the pictures are a little out of order, but I wanted you to see the almost finished project.
Okay its downhill from here. All we have left is the cushion! I just used the existing cushion (no need to make a new one). I made the pattern off of the old one! This will be the easiest part to sew because you can leave an inch all the way around. The only tricky part (for my chair) was that the cushion wasn't exactly symmetrical, so it mattered which piece of fabric was for what side. Make sense? So before cutting just make sure that you trace around the top of the old fabric for the top of the new fabric and vise versa for the bottom (I would keep them separate, too). This way when you finish the cushion fits just right. Another mistake I made: didn't pay attention to what was top and bottom. So my cushion doesn't fit in the sleeve exactly like it should. 
So pay attention!
Next, we are going to sew our piping to the cushion pieces. This tutorial was great for the cushion. It will help you too! I found it was easiest to line the edge of the piping up with my pencil marking (for the outline of the cushion) that way the piping on the cushion is nice and tight where it's supposed to be! 

It also doesn't hurt to iron, or in my case use scissors and create a crease (lazy) along the pencil marking to make it easier to sew. The first picture is creasing before I pinned the piping to it. The second  and third are pinning the piping.


Almost finished! So once you finish the piping, you have your top piece! Then just do the same thing for the bottom piece! The last step is the middle-part in between the top and bottom of the cushion. Obviously I don't know the name of this. Again, use the original fabric for your pattern. I just measured the width of the old and made a strip of new fabric the same width (plus 1/4 inch for sewing). The corners are tough, so I would definitely cut them to minimize the fabric sewn (check this blog for how to cut the corners). 


The zipper was the final step. And honestly I just kind of winged it. On the blog above I wasn't sure what all the technical terms meant, and I was just ready for my chair to be finished at this point so I didn't take the time to learn. (Probably should've because my zipper is jank). But here's after I sewed the zipper in my way:


Guess what? We're finished! Put that in your bank. (I think that's a saying)? And the finished product:
(Oh, I plan on painting the legs, I just haven't gotten around to it.). 


Had to get one with the girls on it, duh.

Next up in the tutorial secsh: a dining room table!!


Friday, October 19, 2012

I think I'm having a half-mid-life crisis

hello all!

I'm so sorry its taken me so long to update...the longer I waited the more I realized I had to update everyone on, so of course- I waited longer. But tonight is the perfect night for a blog post. I'm outside on our new back porch with a cup of tea, and I can see the steam coming from the glass because its chilly outside this evening. And that my friends, is a gift in itself. chilly-ness. Its where I feel my affections for the Lord (not shaken) but stirred.
I'm not listening to any music for the moment because its so peaceful out here surrounded by trees that reach the stars! Another gift...trees. Who would've thought?

Okay, so we are finally in Alabama and we are having a great time getting settled in. I'd say we are already past the "settlement" stage because we've been here like two weeks. Shane has officially started HH-1 (?) academics as of today and will be doing that for like 2 weeks? Oh, I don't know... I act like I do but I'm guessing. I don't have a very good memory. The commander told us the stages of it all and how long they were, but all I remembered was his graduation-- May 24th! That's when we find out what/where we'll be for like two years I think. Shane is wanting rescue helicopters (which I think I've said before). Their official name is HH-60. They seem to be the popular pick around here so for Shane to get them he's going to have to be first or second in his class I think. Honestly I'm kind of nervous, but then when I chill out and think about it I'm not because I know the Lord is bigger than all of this. So we are just asking him for HH-60 and trusting in His provision for us.

What does this mean for me you ask? (I know you all were biting your nails or on the edge of your seat-take your pick). I'm taking this time to really think about my passions and what I feel like the Lord made me to do. What things I love to do, and once I figure that out, maybe pursue those. My degree is in graphic design, but I most certainly do not have a passion for it so I'm not going to get a job just because I have a degree in it. There was one working with a newspaper that was available in a city over and I thought "oh hell no". So when I thought that, a light went off in my head that told me graphic design was no longer a career choice. I want to chase after the things that make my heart beat quicker when I think about them, you know?

This is where my half-mid-life crisis comes in. But its not a bad thing, its a discovering thing...and that's exciting. I'll keep you guys updated when I think about things I'm passionate about.

But in the mean time, let me update you on our craftiness.
I should really just make this a separate post because I have 2 big projects that I want to share-one in great detail. Until then, my companeros (companions in spanish, I think).

*suspense*


Wednesday, September 12, 2012

we should have our own show

Well, as many of you probably already know because I can't seem to keep up on my bloggg, SHANE GOT HELICOPTERS!


Not only did he get helicopters, he also got an award. I think it was called "Top Longhorn" because he was the all-around guy...and longhorn because that's what their flight was called (not to be confused with Texas Longhorns. He doesn't play football). 

So we are moving to Alabama! When you may ask? I'll tell you. September 27th. That's right, in like two weeks. I started packing immediately because if there is a project to be done I don't like waiting until the last minute to get things together. Plus there is SO much to do...mostly creative crafty projects. I posted pictures of my reupholstered chair on instawesome...but I will also put them on here. Along with the detailed process! I'll admit, I've never documented anything to put on a blog, so I'm sorry that I don't have pictures for every step. I have a tough remembering things sometimes. Anyway, so more of that to come later! But since I did  mention that we had projects to finish, I'll show you what shane has been working on while I was busy with my chair: 

As you may remember, Shane so lovingly agreed to build something for our entryway. After all of his hard work, I came across some pictures of stained and buffed wood and LOVED the look. Real professional like. So I gently asked him what he thought about maybe, um, sanding and refinishing the entryway piece. Because he's the best husband ever, he agreed. So we went to Home Depot and spent a million hours researching and got-to-it. I tried to sneak a peak of Shane sanding with his shirt off so everyone could see his pretty muscles, but he just so happened to look at the window while I was peering through the blinds with my camera. Oops. But here's the pictures I do have: 

After he had sanded it completely. That was three days worth of sanding by the way.

This is after we stained it. (Sorry the picture sucks apparently my iPhone pictures aren't as good as I thought). 

And here's close up. I don't know if you can tell, but he buffed it so it looks real shiny and pretty. He did great! That's my man. 

Okay, I'm supposed to be painting our room back to "base-standards" so I'm going to do that instead of procrastinating any longer. More to blog later on the chair-

xoxo, 
gossip girl

(okay not really, its just me Tyler). 


Sunday, September 2, 2012

The Final Turn

I think car races (I'm almost positive that's not the technical term) are an analogy to my life. Well, how I imagine races to be anyway. I'm not a racer, or a race watcher or whatever...but Shane is  playing Mario Kart on WII (so this post isn't completely random). Let me explain my thoughts here.

I'm sure the race car drivers like Koopa Troopa just follow the path in front of them (I chose him because I think he's the cutest...he also reminds me of Pickles). The tracks has straightaways for going lightning fast, and corners for going thunder fast (not as fast as lightning, obviously). I'm also guessing that there are unexpected twists along the way that throws KT off the track,  and then finally when he reaches the finish line...does he even know what place he actually finished in because he's so focused on getting through?

...that game is craz-y. So is my life.

Last week was Shane's last week in T-6 training, which I've talked about for a while now! This Tuesday we find out what he "tracks"...as in what aircraft he's been chosen to fly. None of the students have ANY idea what they are getting assigned. Tuesday at 11, to be exact. Now I have a lot of mixed feelings at this point "in the race" (if you will) because the Air Force is SO unpredictable. So if Shane gets helicopters, we could have to be in ALABAMA in a week. WHAT!? This is exciting and stressful. Exciting because its an unexpected "twist" but stressful because it "throws me off the track. AKA I like having control in my life and this throws it all out the windewr.
Anyway, all this to say, we are at the finish line of the first part of his training. And we will see once we cross it what place we got, and what race will be next. So more importantly, please pray for this next stage! It's going to be crazy fast and exciting!

Okay on to more artsy light things. Because I like to keep it fresh.

I have been working on a few craft projects. One of which is on hold until I get my fabric in (more on that later). But this one! Was A LOT of work and took some patience, but totally worth it in my opinion!

Here we go! I might've mentioned this before but I'm too lazy to go back and check. A while back when we were in Denton we found a great chair and dresser by a dumpster so of course I requested that we stop and pick it up. I forgot to take a picture of it in the before state with the drawers, so you'll see it when Shane has already started, but it still looks pretty ugs:
ew, right? 

Shane working really hard actually. The dresser wasn't in great shape before so he replaced the bottom and made it more reliable than before. (That's my man!)

Here it is after we finished painting it. It's actually a light grey color but it looks white in all the pictures. I thought I took a picture of me painting the drawers but I didn't, apparently. 

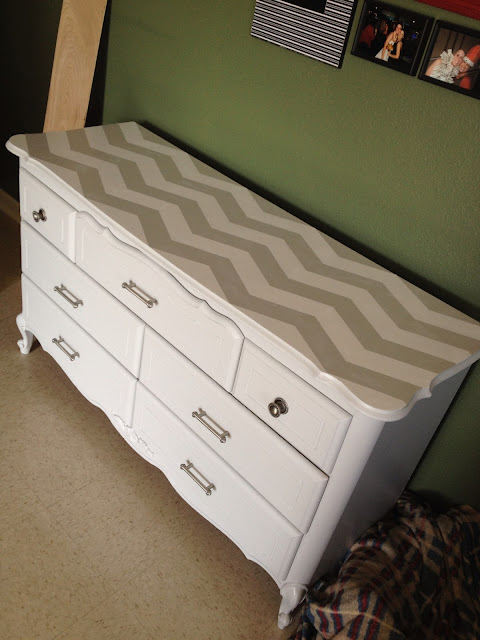
This was the most tedious part...but luckily I found this lady's blog on Pinterest and she had a great idea for making chevron stripes. Thank the Lord for Pinterest, right? Can I get an amen? Yes. Oh and can I also get a drumroll? 
.
.
.

Ta-da! Remember, the body of the dresser is actually a light grey, the same as the grey on the top. But because of the lighting or something, it looks white. But not to be confused because the top has white and grey stripes. So, I'm sure you're confused. 

Anyway, it's time to cook dinner. Taco night! AKA I'm lazy and don't want to cook something that takes longer than 15 minutes.